
Let's Learn Coding Through Scratch!
|
iCan use a block coding language like Scratch to create a computer program.
|
|
Scratch Resources
Part 1: Intro to Scratch
Creating a Scratch Account
|
To get started, lets create our Scratch accounts if you do not already have one. Head to the Scratch Website and find the "Join Scratch" button in the upper right hand corner. Follow the steps to create an account. Note: If you are not 13 years of age or older, you will need to share your parents email account and work through them to verify your account.
|

|
Free Explore Scratch
Find the Explore tab at the top of the main Scratch page. The Explore feature allows you to check out what software programmers are creating in Scratch. Our goal is to make you one of these programmers! Use what you learn to respond to the worksheet below.
A Student's Perspective of Scratch
***1-1 Checking for Understanding ***: Click Here for worksheet on Account Setup and Free Exploring in Scratch! Turn In.
Many of the tutorial materials that we will use in Scratch will be made by Mr. Heyboer or another adult. However, we can also learn about Scratch from our peers, or students our age. Click Here to Check out an intro video that was recently made by a student your age.
The Scratch User Interface
Lets jump into using Scratch! Take a look at the Scratch Surprise instructional sheet. Get your "hands dirty" in the Scratch User Interface. See what you can do, and see what needs more explanation!
Next, lets look at Scratch Studios! What are they? Lets find out by taking a look at the Scratch Studio instructional sheet. Practice posting with your creation from Scratch Surprise above. Check out what else is posted in this Studio. Can you figure out who created this studio?
***1-2 Checking for Understanding ***: Click Here for worksheet that reflects on Scratch Surprise and Scratch Studioi! Turn In to basket in class.
Now lets identify the basic features of the Scratch UI, or User Interface. Start by checking out this Instructional PDF. Below is an image of the UI. Next to it is a list of basic features, or parts, to the UI that you will use over the duration of our Scratch study. Create a new slide in your Digital Notebook with the UI image on it. Label the basic features with arrows, words, and shapes if need be. If you are not sure where a feature is, make your best guess and we will go over it later to make sure you have it right!
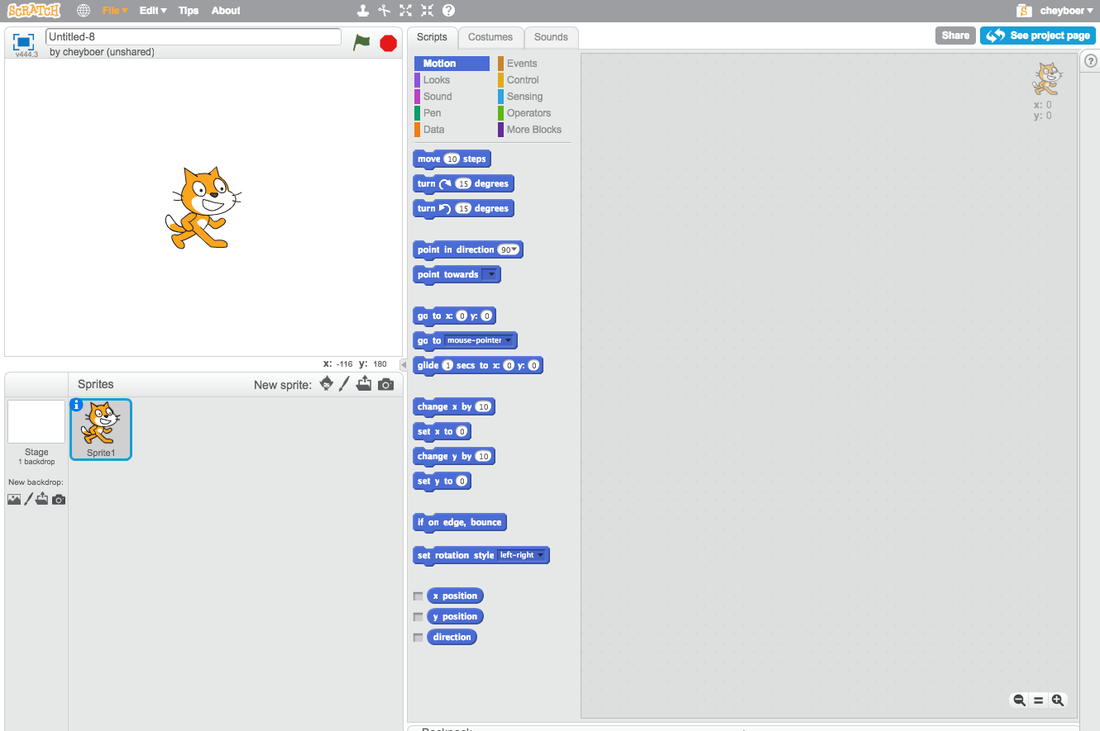
Scratch Online User Inerface (UI)
|
Scratch UI (User Interface) Basic Features
|
Finally for Part 1, lets research a few introductory concepts about Scratch. Record the questions below in your digital notebook and answer them. Be sure to use the PDF resources above as well as the Scratch website to answer these questions:
- What is Scratch?
- Where does Scratch come from?
- What should you do first before creating anything on the Scratch website?
- Does Scratch have an offline option? If so, where can we find it?
- Where do you click to start a Scratch project on the website?
- What does Scratch code look like?
- What does the green flag and red stop sign do?
- What is the purpose of being able to create and/or belong to a Scratch Studio?
- "Good" feedback was mentioned in a few parts of our Introduction to Scratch. What is the meaning of "Good" feedback in this context?
When finished with the Scratch UI Labeling and the questions, Turn in a PDF copy of your Introduction to Scratch notebook slides. Be sure to include the Scratch UI labeling and the 9 questions in your PDF. Name your PDF: S22 YLN IntroScratch
Sprite Movement Practice Objectives
- Create a sprite that walks across the stage and back at 25 steps at a time..
- Create a sprite that glides from the top of the screen to the bottom and back.
- Create a sprite does a clockwise 360˚ spin, and then a counter-clockwise 360˚spin.
- All actions should start at the same time with the Flag click.
- Title your creation "S21 YLN Movement Fundamentals".
Rhythymic Movement/Dancing in Scratch
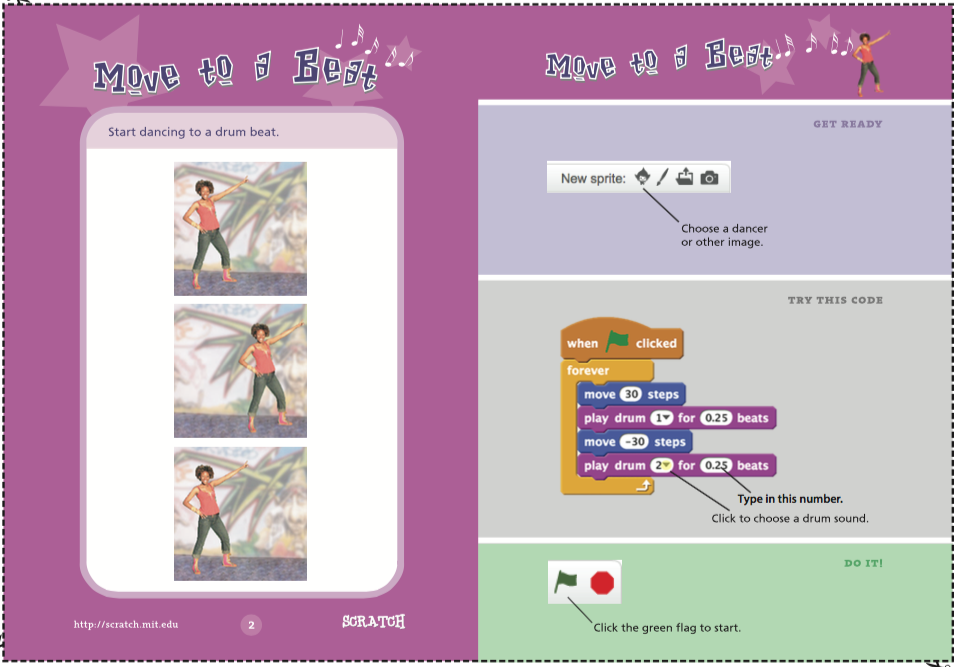
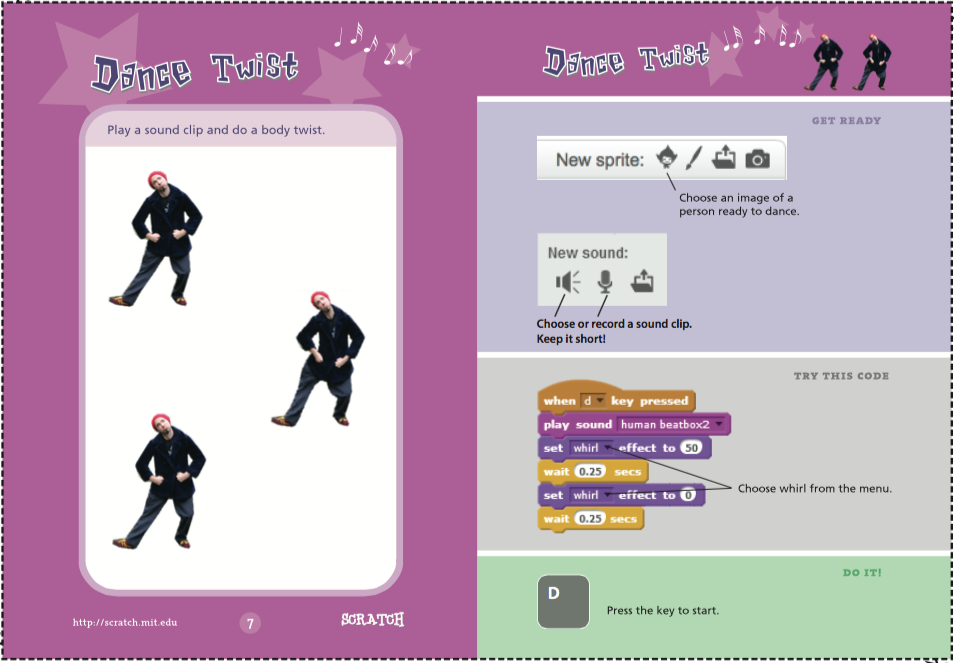
Now lets take a look at a way of animating a sprite through rhythmic movement. Follow the tutorial video and 2 starter cards in a new Scratch project. Create a sprite for each, and complete the directions they give. When complete, turn in to Google Classroom.
|
Rhythmic Movement Tutorial Videos
Sprite Movement Practice Objectives
|
Rhythmic Movement Tutorial Cards
|
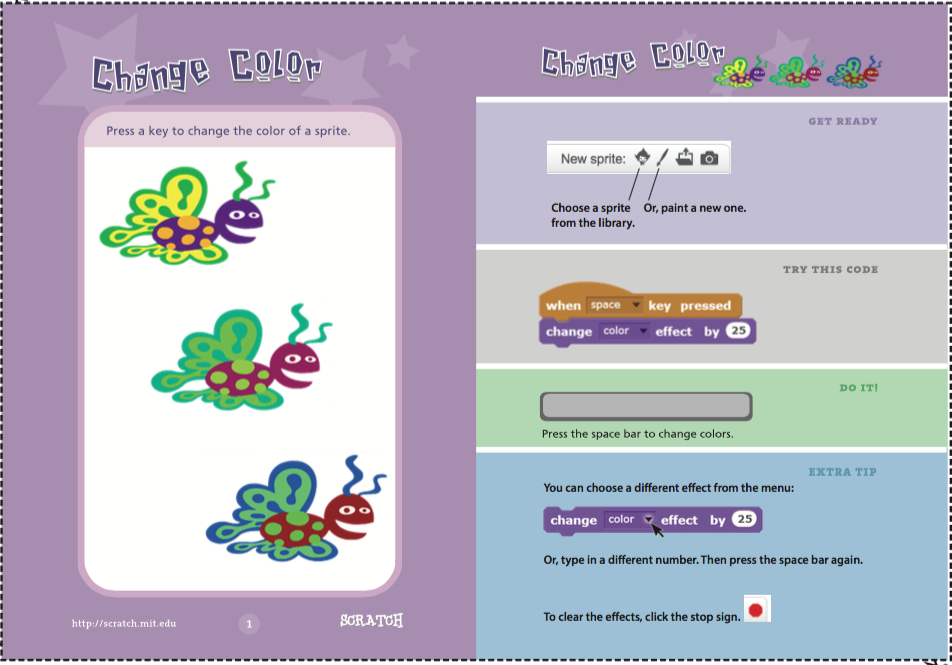
Color Changing in Scratch
One way to add variety, function, and creativity to your Scratch creations is to be able to change colors of sprites. Follow the tutorial video and starter card in a new Scratch project. Complete the objectives below in your Scratch creation. When complete, turn in to Google Classroom.
|
Color Change Tutorial Videos
Sprite Color Change Practice Objectives
|
Color Change Tutorial Cards
|
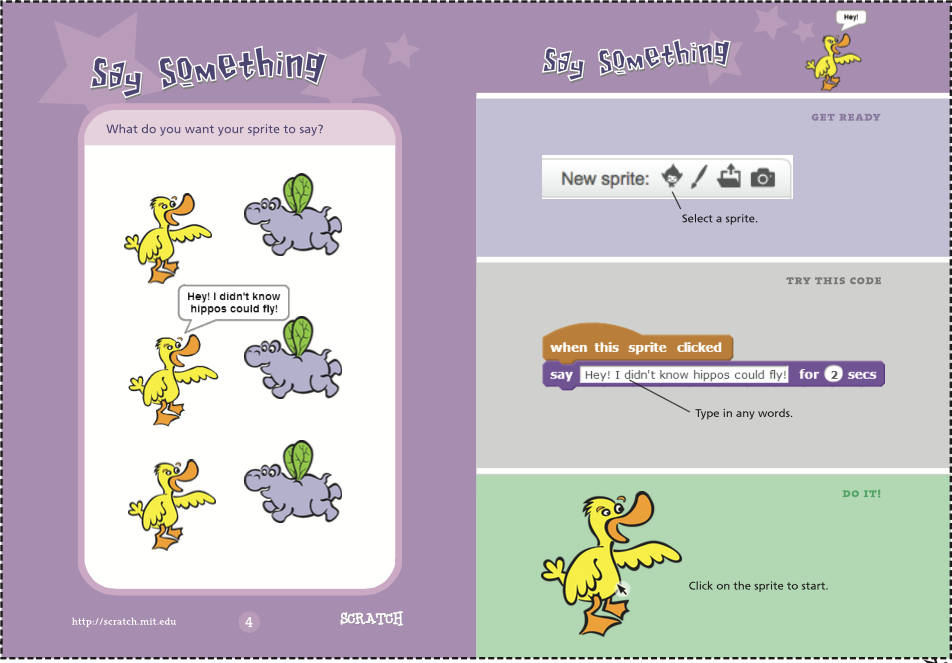
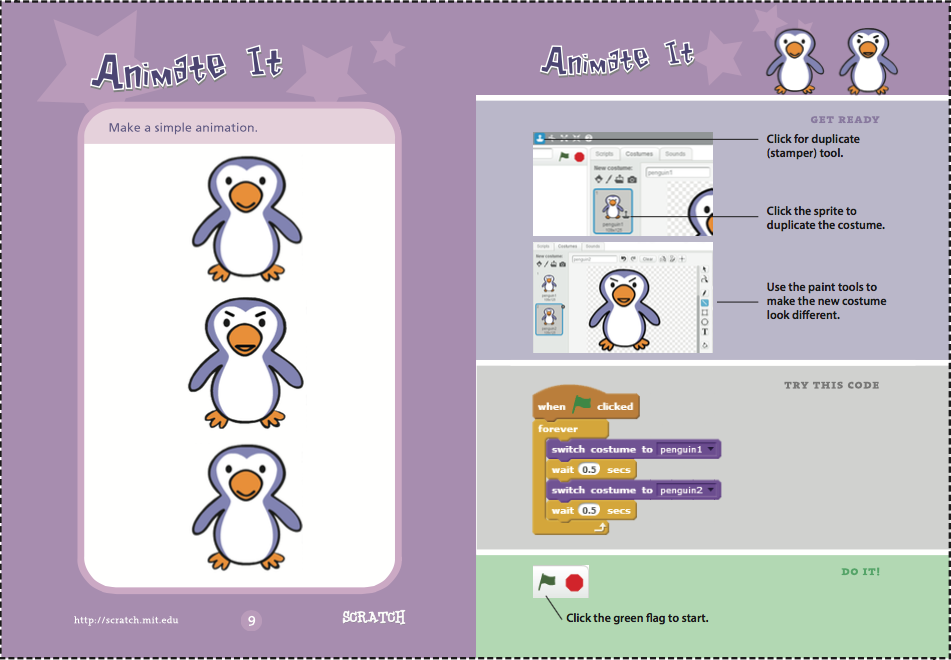
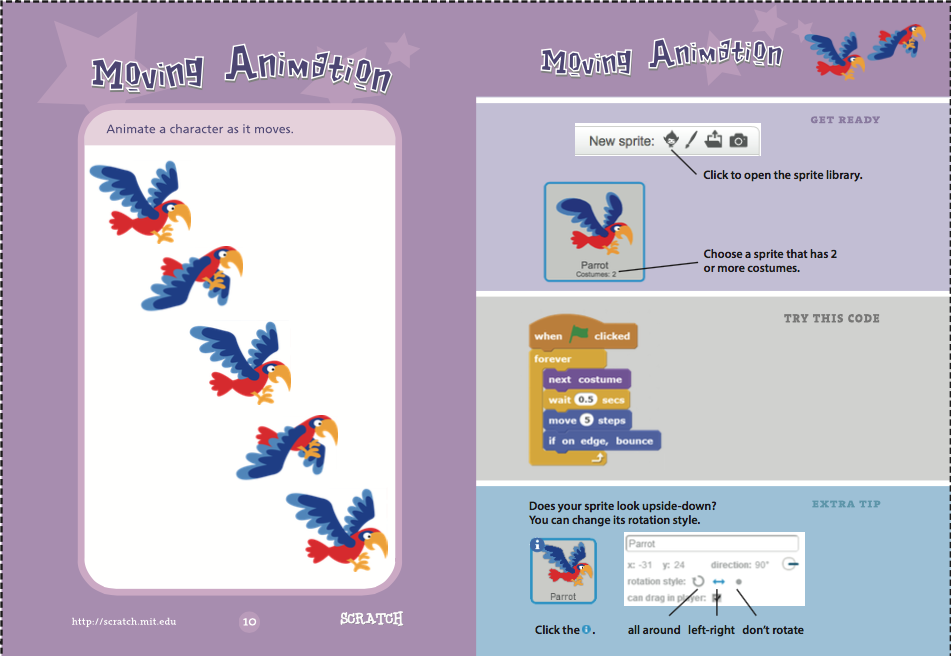
Sprite Animation & Speech in Scratch
Storytelling can be a significant part of a users experience with an program, especially in gaming. Speech/dialogue and animating sprites is are important tools for storytelling in Scratch. Take a look at the starter cards below. Also, you might want to check the Tips section in the top menu of the Scratch UI for more ideas on speech & animation.
|
Animation & Speech Tutorial Videos
Animation & Speech Practice Objectives
|
Animation & Speech Tutorial Cards
|
Sprite Control Options
|
Sprite Control Tutorial Videos
Sprite Control Practice Objectives
|
Sprite Control Tutorial Cards
|
- What is the difference between a stage and backdrop?
- What is a sprite?
- How does Scratch track where sprites appear on the stage?
Part 3: Creating in Scratch
Create a Maze Game
Phase 1: Lets push ourselves a bit beyond the basics and try to create a game. Take a look at this PDF describing the Maze Game Assignment. Create your own sprite by using Paint Editor and maze design for the sprite to go through. If you need help drawing your sprite, check out the Paint Editor tutorial videos on the Scratch website. Your sprite can be a simple geometric shape, or maybe something a little more. Follow the PDF instructions to help make your Maze Game, including the controls. Save as "S21 YLN mazegame", but we are not turning them in quite yet.
One feature that your maze needs to have is to make your character sprite move back to the beginning of the maze.
Phase 2: Now lets take a look at adding some extra challenge to your maze. We will brainstorm in class how to make our mazes more challenging then the first level. Take at least 2 of the ideas for increasing the challenge and make them into a 2nd level in your game. We will talk about how to make a 2nd level attainable in class.
Create a Pong Game
Intro: If you ever wondered how video/computer games got started, Pong is the answer. Take a look at a few of the resources below and learn a little more about Pong and its off shoot, Arkanoid.
Phase 1: Now that you have had a chance to check out the original Pong game, lets make our own. Follow the instructions in the Pong Phase 1 Worksheet below. Note that is this a one player game, and the paddles move horizontally instead of vertically. As you build and play your creation, note some of the other differences in this version of the game. Feel free to help each other out if you get stuck!
Pong Phase 1 Worksheet
Phase 2: Now lets build this game into something more. Did you get a chance to play the Arkanoid game in the intro section? Please do so now if you did not already. The reason for this is we are going to take your Phase 1 Pong creation and morph it into an Arkanoid-type game. Read the list of features you need to add to your Pong game below:
- Add 10 scoring blocks to your game.
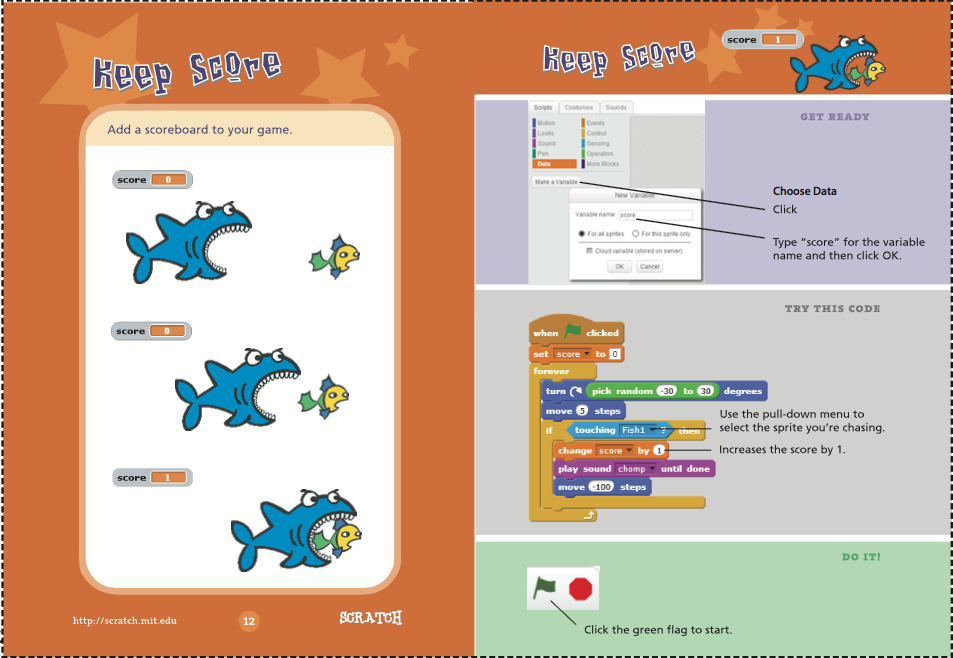
- Add a score keeping sprite to your game.
- When the ball touches the blocks, they disappear and the player gains a point.
- When the player scores all 10 blocks, the game will go to the 2nd level.
- There needs to be 15 or more scoring blocks on the 2nd level.
- The player gets 3 attempts in the game. An attempt is lost every time the ball gets by the paddle.
