
1A: 3D Design Basics
(7th Grade STEM)
|
Develop a better level of understanding in using 3D design software.
|
|
Learning Progression
3D Controls: iCan use the basic controls in a 3D design environment.
Lingos
|
Defintion Matching
|
Learning Activities
- Resource 1
Grouping: iCan describe the two different types of Grouping strategies for 3D design and demonstrate their use.
Lingos
|
Defintion Matching
|
Learning Activities
- Get into Tinkercad and create a transparent object. Screenshot it and put your example on the Transparent lingo slide.
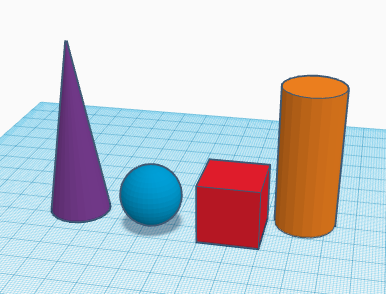
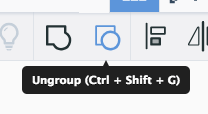
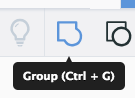
- Take a look at the screenshots below. Place both on the Grouping lingo slide.
|
|
- Get into Tinkercad and take a look at the Group It starter training. Create a Solid Grouping and a Transparent Grouping. Add the examples to their matching Lingo slide, and both labeled on the Grouping iCan slide.
ScreenShotting: iCan take partial and full screenshots on the Mac Lab computers as well as on my Chromebook. While this is not directly related to 3D Design, it is an essential skill that we will use moving forward in class.
Lingos
|
Defintion Matching (Match with Lingo)
|
Learning Activities
- Screenshotting visuals Tutorial - Follow this tutorial to create the visuals for the Screenshotting iCan/Lingos, which will be very helpful in your learning.
- Logitech Keyboard Website
- Chrombook keyboard example Website
- Google Slides Table Tutorial - This tutorial will show you how to create a table in Google Slides focusing on the controls for screenshots on your Chromebook and Mac Workstation.
Basic Authentic Design: iCan create a basic 3D Design drawing using software like Tinkercad to demonstrate a design idea that I have.
Lingos
|
Defintion Matching
|
Learning Activities
Tinkercad Practice Portfolio 1: Listed below are various projects and lessons for 3D Design drawings that we have pulled from the Learn section of the Tinkercad website. Click the Blue hyperlink to the project/lesson and complete it. Take a screenshot of each final 3D design. Start at new Google Slides file title "YLN Tinkercad Practice Portfolio 1". Remember that YLN stand for Your Last Name. Place your screenshots on the slide(s) there. Be sure to label each screenshot on the slide(s) using the hyperlink names below.
Graded Practice Activity: When you finish your 8 3D drawings and placed labeled screenshots into your Google Slides file, turn it into the Tinkercad Practice Portfolio 1 activity in Google Classroom.
- Complete the Introduction to Primitive Shapes project in Tinkercad.
- Complete the Chess Pawn lesson in Tinkercad.
- Complete the Basic Ring lesson in Tinkercad.
- Complete the Duffel Button lesson in Tinkercad.
- Complete the Flower Button lesson in Tinkercad.
- Complete the Bat Button lesson in Tinkercad.
- Complete the Skull Button lesson in Tinkercad.
- Complete the Lets Learn Tinkercad: Castle project in Tinkercad.
Graded Practice Activity: When you finish your 8 3D drawings and placed labeled screenshots into your Google Slides file, turn it into the Tinkercad Practice Portfolio 1 activity in Google Classroom.
